1. Turn the mode dial (A) to M2. On the top of the camera, press the WB button and turn the dial (J) until it is set to auto or colour temperature that matches the light source. The little light bulb is for tungsten lights3. Press ISO on the top of the camera, then using the dial on the top of the camera set it to either Auto or set it to a specific ISO. The advantage of setting it to a specific ISO is that you will know whether or not you have enough available light so you don’t create grainy footage. Ideally – you will have an ISO of close to 100-200 and your shutter speed will be 1/30th or faster4. Turn the autofocus switch on the lens to manual – autofocus will not work too well with this video5. Press menu (use dials on top and back camera to navigate)
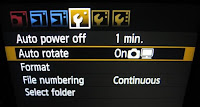
Under the first wrenchChose format (to select the hit button (I)), then use (J) to say ok
This will reformat the card deleting all images and video
Under the wrench,
Choose Live View/Movie func. Set
- Choose LV func. Setting- Choose Stills + Movie- Choose Movie Display
- Back in View/Movie Settings- Set Grid Mode to Off- Set Metering Timer to 1 min- Set AF Mode to Live Mode- Set Movie Red Size to 1920x1080 24- If you are not using mics – set Sound Rec to Auto
6. Press the Live Video button (B)7. Press the INFO button until the information pops up along the bottom of the screen8. To focus, press the Magnify (N) button twice to 10x, steer around with the (K) joystick, and then manually focus the lens.9. To control the exposure and depth of field, use the dial on the back of the camera and on the top of the camera to adjust fstop and shutter speed10. To control colour settings, you can press (D) and pick a preset or fine tune. In class I suggested using Neutral – because it doesn’t oversharpen11. To start or stop shooting press the set button (I) on the back of the camera


No comments:
Post a Comment